This ImageJ plugin is part of the morphology plugins collection and can be used to classify binary particles according to morphological parameters in the Results Table.
Those parameters are usually extracted by other plugins (such as the built-in Particle Analyzer, Particles4, Particles8 and Lines8).
The plugin is a front end to generate and run a macro named Particle_Classifier.ijm that will be automatically stored in the macros folder. Note that the macro is re-written with new parameters each time the plguuin is run. In brief, the Classify_Particles plugin expects:
- ImageJ version 1.35j or later (if you intend to use the data generated by the built-in Particle Analyzer)
- A binary 8bit image open in ImageJ containing the particles to be classified
- A valid open Results Table, which holds the data to classify the particles
- The Slice number must be in the Results Table
- The particle Starts (XStart, YStart) must be in the Results Table
- Columns without clashing names
The Classify_Particles plugin, at run time, performs 5 tests:
-
- Is the current image binary? The plugin works only with (8-bit) binary images because uses Binary Reconstruction to keep/delete particles that match (or do not match) a particular query. The Particles4, Particles8 and Lines8 plugins all work on binary images, but the built-in Particle Analyzer can process greyscale images too. In that case, the image needs to be thresholded before running this plugin. See below an example for dealing with greyscale images.
- Is there an active Results Table? The plugin uses the data stored in the Results Table to classify the particles, so if there is no Table, there is no data to base the classification on.
- Is the Slice Number recorded in the Results Table? The plugin can process single images or stacks, but it must know to which slice each particle belongs to. ImageJ v1.35j added the option to output the slice number (Analyze>Set Measurements >Stack position) for the Particle Analyzer. Please check that option even for single images before running the Particle Analyzer.
The Particles4, Particles8 and Particles8_Plus all output the slice number by default. - Have the particle Start Coordinates been recorded in the Results Table? As mentioned above, the plugin uses Binary Reconstruction to keep or delete particles (the Binary_Reconstruct plugin is included in the Morphology collection). The reconstruction uses the particle start coordinates (this is a pixel that is guaranteed to be in the particle) as seed and the original image as the mask. If you are using the Particle Analyzer, please check the Record Starts option.
The Particles4, Particles8 and Lines8 all output the particle starts by default. - Do the column names in the Result Table clash after removing non-word characters? The column names are converted to macro variable names and they cannot contain invalid characters. The plugin deletes all non alphanumeric characters (for instance “Dist.” becomes “Dist“. If two names clash (for example: “Circ.” and “C-ir*c” are both reduced to “Circ“, similarly “Area” and “%Area” will clash), then it is not possible to process the query correctly since both variables would have the same name.
If any of these tests fail, an error message shown with further instructions, otherwise the main dialog will appear:
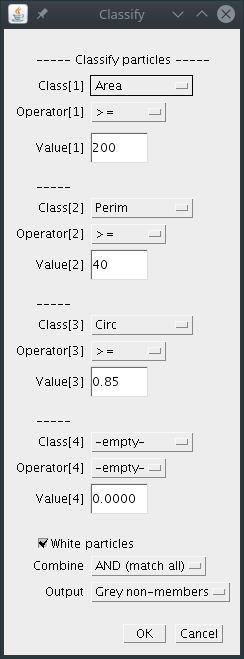
Here the user defines up to 4 classes by selecting a morphological parameter, a logical operator and a value for each class.
The morphological parameters are the columns in the Results Table.
The logical operator is one of the following:
| > | greater than |
| >= | larger or equal |
| == | equal to |
| <= | smaller or equal |
| < | smaller than |
| != | not equal to |
The image above shows that the classification consisted of: Area>=200 AND Perimeter >= 40 AND Circularity >0.85.
This can also be recorded as a macro (mind the line breaks).
run("Classify Particles", "class[1]=Area operator[1]=>= value[1]=200 class[2]=Perim. operator[2]=>= value[2]=40 class[3]=Circ. operator[3]=> value[3]=0.85 class[4]=-empty- operator[4]=-empty- value[4]=0.0000 combine=[AND (match all)] output=[Grey non-members] white title=Subset");
Check “White particles” for white particles on a black background (or leave unchecked for black particles on a white background).
“Combine” allows to set a logical constrain for the result. Currently supported are:
AND = (Class[1] is true) AND (Class[2] is true) AND (Class[3] is true) AND (Class[4] is true)
OR = (Class[1]) is true) OR (Class[2] is true) OR (Class[3] is true) OR (Class[4] is true)
Classes which are left empty are ignored.
“Output” sets the choice of results:
- “Keep members” (keeps the particles that match the query and deletes the rest),
- “Grey non-members” (keeps matching particles in the original colour and sets the non-members to grey)
- “Grey members” (sets the members to grey and leaves the non members in the original colour)
- “Delete members” (deletes the particles that match the query)
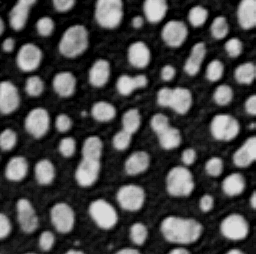
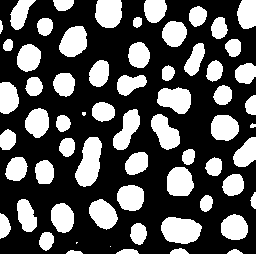
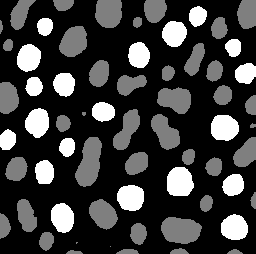
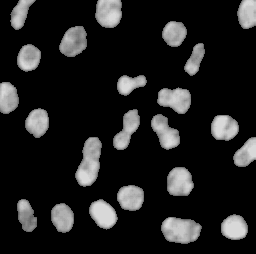
The following are the original image, binary image and classification result with “Grey non-members” option when analysing the image with the Particles8 plugin:
:
A text string representing the query is stored as metadata and can be read with the Image>Show Info… command.
The classification itself is done by a macro generated automatically by the plugin according to the choices made in the main dialog. This macro is named “Particle_Classifier.ijm” and is stored in the /ImageJ/macros directory. You should rename the macro if you want to preserve it for further classifications. Otherwise, it will be over-written each time the plugin is run.
Complex combinations
More complex combinations can be done by running several queries on the original image and performing subsequent logical operations with the results.
For example:
((Area > 200) AND (Perim <= 50)) OR (Feret < 100)
can be achieved by first performing:
(Area > 200) AND (Perimeter <= 50)
save/rename the result with a new name,
run a new query on the same original image and Results Table:
(Feret < 100)
and finally combine both results using the OR operator in the Image Calculator.
imageCalculator("OR create stack", "Result1", "Result2");
Working with greyscale images
Assuming white particles on a black background, there are only a couple of extra steps to produce greyscale results:
- Let’s assume that the original image is called “Ori“)
- Make a copy (let’s call it “Temp“)
- Set the threshold of the “Temp” image using “Adjust Threshold” and press “Apply” (this binarises the image)
- Run the Particle Analyzer or Particles8 on the “Ori” image to extract the morphological parameters
- Run the Classify Particles plugin on the “Temp” image and select the output “Keep members“
- The result is the “Subset” image (also binary). Now do a logical AND operation between the “Ori” and “Subset” images:
imageCalculator("AND create", "Subset","Ori");
This retains all pixels in the “Ori” image that correspond to the white pixels in the “Subset” image: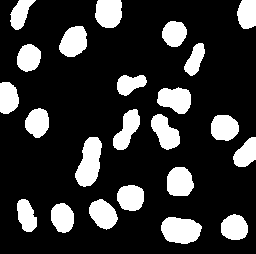
- The result is now an image that has black background with greyscale particles.To see what particles have been left out:
imageCalculator("XOR create", "Subset","Temp");and to see them in greyscale, just AND that result with “Ori“.