In this blog post on Advanced Research Computing tips, one of our Research Software Engineers, Dr James Allsopp, gives some tips on logging into Linux-based systems such as BlueBEAR and Baskerville, using tmux.
Whenever I have to remote into a Linux-based system, one of the first things I look for is a program called tmux. tmux is short for “Terminal MUltipleXer” and it solves two problems you can run into on remote systems.
The first of these is that any process you run only lasts as long as the process that spawned it, so if you start something running and you lose your connection to the remote machine, bad luck, time to start again. In the past, this was solved with a program called nohup, but with tmux, you can just log back into the system and reattach to your tmux session, and your task is still running. This is really useful for slurm interactive sessions and nohup won’t help here.
The next, and probably more useful, is the situation where you’ve logged into a remote system, and you’d like to look at a file in an editor, whilst running commands in another window, without having to keep leaving the editor. Previously you would have had to SSH in twice in two separate windows, but what tmux allows you to do is to multiplex multiple terminals into one SSH connection, so that with two key presses you’ve a new terminal already logged in to the remote machine.
Starting tmux
So how do you start with this? Both the University of Birmingham HPC systems (BlueBEAR and Baskerville) have tmux installed, so just log in with SSH, and type in tmux:

Having done that, you’ll get a screen that looks very similar to the previous screen, but with a line across the bottom:

This line is tmux’s addition to your terminal window, the important bit is 0:bash* which says that this window is in tmux’s zero position and the asterisk says it’s currently in use. All tmux commands are preceded by a prefix key which you have to press first, the default is <ctrl>-b, but if that’s conflicting with other applications, you can find out how to change this here with some other hints besides.
Creating new windows
The next thing to do is to create a new window for your editor or another process, and we do that with <ctrl>-b c. You’ll now see that two windows are showing in tmux’s status bar:

Moving between windows
The asterisk has moved to the second of these (1:bash) indicating that this is now the window we’re working in. To move between these, you can either use the <ctrl>-b <window number> e.g. <ctrl>-b 0 or use <ctrl>-b p and <ctrl>-b n, short for previous or next. After doing this, we can see that the asterisk has moved to the other window:

Renaming windows
After a couple of windows, it can get hard to keep track, so you might want to rename your windows to give them more sensible names. We can do this with <ctrl>-b , then enter the new name of the window, in this case, “First Window”:

Eventually, you might just want to bring up a list of all the windows you have open, and this is easily achieved with <ctrl>-b w. If you want to close a window, just use <ctrl>-b &.
Closing a session
Finally, to close a tmux session, use <ctrl>-b d. Next time you login to a computer, you can reattach to a session by typing tmux a at the command line, and everything will be back to where you left it. One caveat is that this will only work from the login node you originally started the session on before disconnecting, because most HPC systems have multiple login nodes attached to the same address. In this blog, the address bluebear.bham.ac.uk links to bb-pg-login01, but on subsequent logins this could be bb-pg-login02. You can fix this once you’ve logged into another node by ssh’ing to the correct node, in this case, ssh <username>@ bb-pg-login01
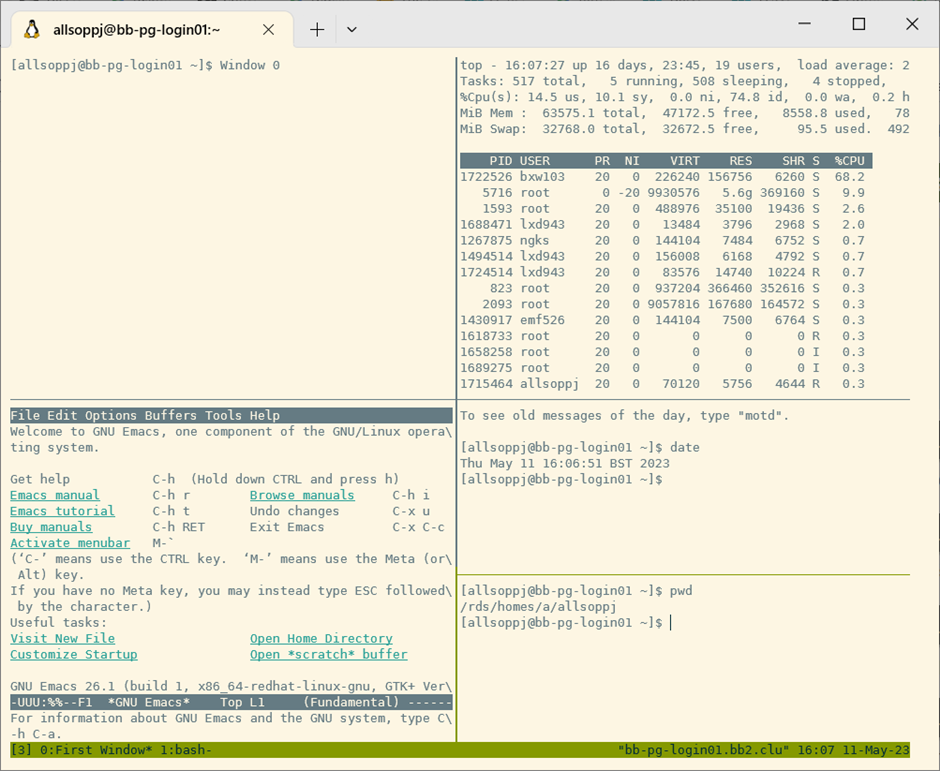
This is only the briefest of introductions to tmux, we’ve not looked at multiple sessions, and how to name them, or splitting the tmux window into panes, but you can get an idea from this cheatsheet and the screen shot below:

Here’s to easier remote working and less lost work!
